|
Kingston urDrive� User Manual
|
|
|
Table of Contents
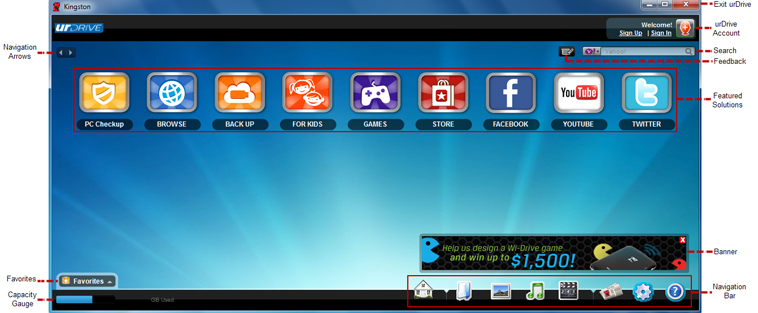
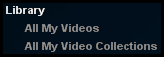
| Exclusive to Kingston�s DataTraveler� USB Flash drives*, urDrive is preloaded software that gives you a new and exciting way to look at and manage the content of your USB Flash drive.� In addition to its stylish new interface and desktop approach to organizing your data, urDrive also introduces new ways to help protect and improve the performance of your computer. |
*Note: urDrive is available on specific DataTraveler� products only.� For the most up-to-date information on urDrive, please visit us on the WEB at www.kingston.com/urdrive.
System Requirements
|
PC Platform
� Intel Atom Processor (or faster) � 150MB free space on USB Flash drive � Java-enabled browser � Internet access required for urAppZone and urDrive�s featured solutions
|
|
PC Operating System Support
� Windows� 7 � Windows� Vista SP1, SP2 � Windows� XP� SP3
|
(Note: For optimal performance, 2GB of system RAM is recommended.)
Getting Started
|
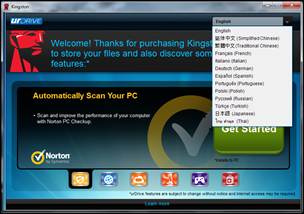
1. Launch the urDrive software by double-clicking on the urDrive.exe file located on your USB drive. 2. Select your preferred language from the drop-down menu. Figure 1.1. 3. Click the Get Started button to continue to the End-User License Agreement. 4. You may choose to: �accept the terms and conditions�, �decline and close� or �decline and uninstall�. In order to use the software, select Accept Terms & Conditions and click Next to proceed.
|
|
Figure 1.1 � Welcome Window |
Home Screen
|
|
|
Your �Home Screen� provides access to every facet of urDrive. From here, you are able to create a urDrive account, explore the �Featured Solutions�, add content via the �Navigation Bar�, and experience everything urDrive has to offer.
|
|
|
|
|
|
The PC Checkup feature allows you to download a free software tool that automatically scans your computer for potential security risks and/or performance problems.� It also helps improve security and keeps your computer running like new. For support information please visit http://us.norton.com/nortonlive/free-pc-checkup.jsp. |
|
|
|
The Browse feature allows you to �surf� the Internet using Maxthon�s Dual Display Engines�, customizing your WEB experience with lightning fast technology and the ability to switch between Ultra Mode and Retro Mode.� For support information please visit www.maxthon.com/help-and-support. |
|
|
|
The Backup feature allows you to backup and restore data based on user preferences specified in Vdrive, urDrive�s backup utility.� You can also backup your data using the optional online backup, providing you a safe and secure way to access your data from any WEB browser. For support information please visit http://skyfile.maxthon.com/help.html |
|
|
|
For Kids is an application that provides children with a safe and secure Internet environment, while providing parents the ability to control and monitor what their children are accessing online.� Using a customizable dashboard, you can allow or disallow specific content based on age, gender, or interests. For support information please visit www.urfooz.com/fooz-kids/account/support/request. |
|
|
|
The Games link offers a list of new and exciting games to try out. You can download additional games using the �Store� link. |
|
|
|
The Store link serves as a portal to urAppZone, where you can access hundreds of downloadable games, applications, and utilities. |
|
|
|
The Facebook� link provides quick access to the Facebook login screen via the embedded Maxthon browser.� |
|
|
|
The YouTube� link connects you to the Youtube homepage. From here you can log into your account or search for numerous user-generated videos. |
|
|
|
The Twitter� link is a shortcut to the Twitter homepage.� From here you can create an account or log into an existing account. |


|
|

|
|
|
The Home icon provides you with a simple one-click return to the main screen from anywhere within the urDrive application. |
|
|
|
The My Files icon allows you to access all of the content stored on urDrive (and its subfolders), regardless of file type or program extension.� Unlike My Photos, My Music, & My Videos, My Files does not associate itself with a specific file type and therefore displays all urDrive content without filtering. For additional information, see �Exploring My Files� on page 12 of this document. |
|
|
|
The My Photos icon provides a quick and easy way to access all of images stored on urDrive (in the Photos folder.)� Only the file types supported by My Photos will display in this section.� [Supported file type(s): .jpeg, .jpg, .bmp, .gif, .cdr, .psd] For additional information, see �Exploring My Photos� on page 13 of this document. |
|
|
|
The My Music icon provides a quick and easy way to access all of the music content stored on urDrive (in the Music folder.)� Only file types supported by My Music will display in this section.� [Supported file type(s): .mp3] For additional information, see �Exploring My Music� on page 15 of this document. |
|
|
|
The My Videos icon provides a quick and easy way to access all of the video content stored on urDrive (in the Video folder.)� Only the file types supported by My Videos will display in this section.� [Supported file type(s): .avi, .asf, .mpeg, .mpg, .wmv, .rmvb, .rm, .dat, .mp4, .mov] For additional information, see �Exploring My Videos� on page 18 of this document. |
|
|
|
The News icon provides you access to all of the latest information on Kingston�s products. |
|
|
|
The Settings icon allows you to customize the user-experience by providing access to some of the interface preferences available on urDrive, including language selection, background, and profile image. For additional information, see �Exploring My Settings� on page 20 of this document. |
|
|
|
The Help icon allows you to view and / or print the User Guide for this product and also obtain additional support information by visiting Kingston on the WEB at: http://www.kingston.com/support/urDrive. |


|
|
|
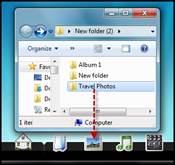
urDrive supports �drag-and-drop� functionality for simple file management.�
Populate urDrive using the Windows Explorer interface by copying specific file types to their respective folders, i.e. .jpg files to the Photos folder, .mp3 files to the Music folder, and so on. �See Figure 2.1.
By arranging your files in this manner, your files will be easily accessible and will remain organized in urDrive. |
|
Figure 2.1� � Drag and Drop
|
|
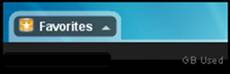
For commonly accessed files, use the Favorites folder located on the urDrive desktop.
Click on the Favorites button and drag files from your Windows Explorer interface into the Favorites window. See Figure 2.2.
|
|
Figure 2.2 � Favorites |
|
|
|
|
|
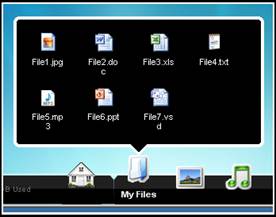
You can display the content of My Files, My Photos, My Music, and My Videos by placing your mouse pointer over the navigation link as shown in Figure 2.3.* �������������������������������� Once the pop-up is displayed, you can double-click on the file you wish to view or double-click on the directory (My Files, etc) to display all supported content within those locations.
(Reminder: �My Files� will display all file content, regardless of file type, while the remaining navigation links will display only the supported file types associated with that category.
|
|
Figure 2.3 � Mouse-Over Display |
|
Your Capacity Gauge is located the lower left-hand corner of your urDrive home desktop. Your USB drive�s remaining (or available) capacity is displayed both numerically and graphically. See Figure 2.4.
|
|
Figure 2.4 � Capacity Gauge
|
|
As you add content to your device, this gauge will increase until your drive reaches full capacity.
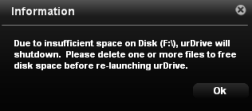
If you attempt to overfill urDrive, you may receive the warning seen in Figure 2.5.
To resolve this issue, close urDrive, delete one or more unused files and re-launch urDrive. |
|
Figure 2.5 � Overfilling urDrive |
|
*Note: The mouse-over function displays content stored in each of the corresponding navigational links from the home screen only.� If you are currently displaying content from within a link (My Photos, My Music, etc.) then a single mouse click will initiate the display of file types associated within that category. |
General Usage
|
|

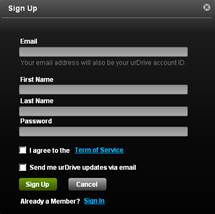
(Note: If you already have an active urDrive account, you may skip this step and go to Sign In.)
|
Click the Sign Up link located in the upper right corner of the home screen. During the sign-up process, you will be asked to provide an email address, your first name, last name, and a desired password.� Enter the appropriate information into the fields provided, as seen in Figure 3.1. Accept the Terms of Service and click Sign Up to complete the process. You may opt to receive urDrive updates via email by clicking the appropriate check box.� (This field is optional.)
|
|
Figure 3.1 � Sign Up Window |
|
Sign In (to your urDrive Account)
Click the Sign In link located in the upper right corner of the home screen. Enter the email address and password you used to sign up for urDrive as seen in Figure 3.2 Click the green Sign In button to proceed.
|
|
Figure 3.2� � Sign In Window |
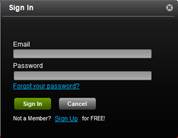
| (Note: If you forget your password, you can reset it by clicking the Forgot your password? link in the �Sign In� window.� You will need access to the email account you registered when you signed up for urDrive. For support information related to your account, please visit www.urfooz.com/help/contact-us ) |
|
Navigate backward or forward within the interface by using the quick navigation arrows.
You can also quickly access the urDrive home desktop by clicking the house icon next to the navigational arrows. See Figure 3.3. |
|
Figure 3.3� � Quick Navigation
|
|
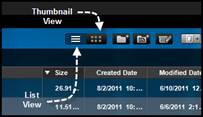
Once you�ve added content to urDrive, you can view it within the interface as a list or as thumbnails, as seen in Figure 3.4
List View will display various file attributes and information.
Thumbnail View will display the default image provided by Windows Explorer. |
|
Figure 3.4 � View Preference
|
|
Create a new item by selecting the icon seen in Figure 3.5.� This item will be different depending on your location within the �Navigation Bar�
|
|
Figure 3.5 � Create Folder |
|
In addition to adding files via the Windows Explorer interface you can also import files from within My Files, My Photos, My Music and My Videos.�
Select the icon (as seen in Figure 3.6) and choose Import Files to import individual files or Import Folders to import a folder and its contents.
(Note: The File Import icon will vary in appearance when in My Files, My Photos, My Music and My Videos but functionality will remain the same.) |
|
Figure 3.6 � File Import |
|
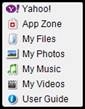
The search field allows you to search for information on the WEB and also provides you with the ability to search your USB drive for locally stored content.
Use the drop-down menu to explore all of your search options. See Figure 3.7
|
|
Figure 3.7 � Search Field
|
|
A Yahoo! search will launch the embedded Maxthon browser to conduct your search on the WEB.
Searching the App Zone will help you find the application you are looking to download.
By selecting My files, My Photos, My Music or My Videos you can narrow your search results and locate supported file types quickly.
Searching the User Guide will allow you to quickly locate answers to your questions relating to the features and functionality of urDrive. See Figure 3.8.
|
|
Figure 3.8 � Search Options
|
|
|
|
|
|
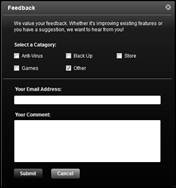
Access the Feedback option from any screen to provide suggestions on ways to improve the urDrive experience. See Figure 3.9.
|
|
Figure 3.9 � Feedback
|
|
To complete the feedback form, select the category you wish to comment on. You can choose from: Anti-Virus, Back Up, Store, Games, and Other.
After you�ve selected your category, you must enter your email address in the �Your Email Address� field and input your comments in the �Your Comment� field see Figure 3.10.
Click Submit to proceed. You will receive confirmation that your submission was successful. |
|
Figure 3.10 - Feedback Form |
|
|
|
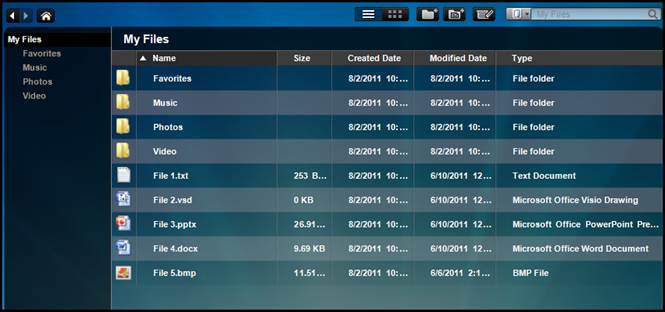
The My Files icon allows you to access all of the content stored on urDrive (and its subfolders), regardless of file type or program extension. urDrive utilizes your default Microsoft Windows� applications to open files selected in your My Files window. |
|
Create a New Folder by selecting the folder icon seen in Figure 4.1.� |
|
Figure 4.1 � Create� Folder
|
|
Your new folder will appear in the left window pane below the default urDrive folders.
To rename this folder, right-click and select Rename to input your desired name, as seen in Figure 4.2. |
|
Figure 4.2 � Folder Rename
|
|
Add content to your new folder by clicking the Import Files and Folders button. From here you can import individual files or complete folders into My Files. See Figure 4.3.
|
|
Figure 4.3 � Import Files and Folders
|
|
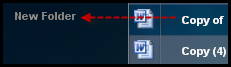
You can add content to your folders by selecting a file or groups of files, then dragging them from your main My Files window into your New Folder. See Figure 4.4. |
|
Figure 4.4 � Adding content to My Files
|
|
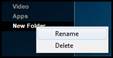
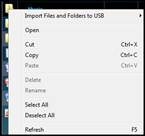
You can access additional menu options (as seen in Figure 4.5) by right-clicking your files in the main window.
(Note: The �Favorites�, �Photos�, �Music�, �Video�, and �Apps� folders cannot be renamed, deleted or cut from �My Files� as they are required for urDrive functionality.)
|
|
Figure 4.5 � Additional Options |
|
Sort your files by �Name�, �Size�, �Created Date�, �Modified Date�, and �Type� in �My Files� by clicking on the corresponding column header.�
Example: To sort by name click on the �Name� header and your files will be displayed alphabetically from A-Z. Click �Name� again and they will display from Z-A.
|
|
|

|
The My Photos icon provides quick access to all of the picture content stored on urDrive (in the Photos folder.)� Only the file types supported by My Photos will display in this section.� [Supported file type(s): .jpeg, .jpg, .bmp, .gif, .cdr, .psd] |
|
Activate Slideshow mode by selecting All My Photos or a photo album and click the play icon in the upper-right corner of the main All My Photos window. See Figure 5.1.
|
|
Figure 5.1 � Play Slideshow |
|
While playing a slideshow you can skip forward or backward, pause, maximize the window, adjust�� viewing settings*, rotate and/or delete the image by using the control panel as seen in Figure 5.2.
|
|
Figure 5.2 � Slideshow Toolbar |
|
*Slideshow settings can be adjusted so that you can increase or decrease the time delay between each image and/or toggle the Repeat Slideshow feature. Remember to save your settings once you�ve made your selection. |
|
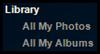
The All My Photos category displays all photos within your �Photos� folder.
The All My Albums category displays all albums created within urDrive in addition to any albums copied onto the My Photos icon in the Navigation Bar.
|
|
Figure 5.3 � Photo Library
|
|
|
|
|
|
Add image content by clicking the Import Photos and Albums button. From here you can import individual files or complete albums into My Photos. See Figure 5.4.
|
|
Figure 5.4 � Import Photos and Albums
|
|
Create a new Untitled Album by selecting the folder icon seen in Figure 5.5 |
|
Figure 5.5 � Create Album
|
|
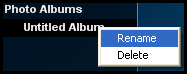
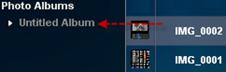
Your Untitled Album will appear in the left window pane below the Photo Albums category.
To rename this folder, right-click and select Rename then input your desired name. See Figure 5.6.
|
|
Figure 5.6 � Album Rename
|
|
You can add content to your albums by selecting an image or group of images, then dragging them from your main All My Photos window into your new Untitled Album. See Figure 5.7.
|
|
Figure 5.7 � Adding Content to Albums |
|
You can access additional menu options by right-clicking your files in the main window.� Please refer back to Figure 4.5.
|
|
|
|
Sort your files by �Name�, �Album�, �Modified Date�, �Size�, and �Type� in �My Photos� by clicking on the corresponding column header. |
|
|
|
The My Music icon provides a quick and easy way to access all of the music content stored on urDrive (in the Music folder.)� Only file types supported by My Music will display in this section.� [Supported file type(s): .mp3] |
|
Use the built-in music player to play your audio content by double-clicking on the file you want to listen to.
While playing music you can skip forward or backward, pause, adjust volume, repeat all, repeat once, and shuffle. See Figure 6.1 for reference. |
|
Figure 6.1 � Music Player
|
|
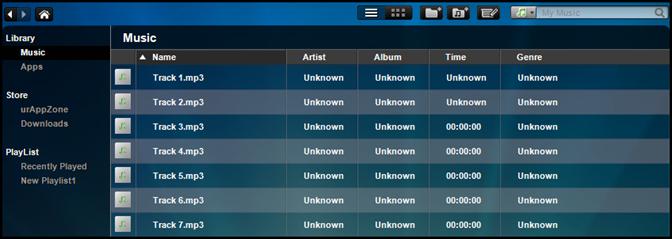
The Music category displays all music within your Music folder.
This category is located on the left-hand side of the My Music interface as seen in Figure 6.2. |
|
Figure 6.2 � Music Library
|
|
|
|
|
|
Add audio content by clicking the Import Tracks and Albums button. From here you can import individual tracks or complete albums into My Music. See Figure 6.3.
|
|
Figure 6.3� � Import Tracks and Albums
|
|
You can create a music playlist by selecting the New Playlist button seen in Figure 6.4.
|
|
Figure 6.4 � Create Music Playlist
|
|
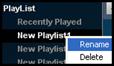
Your New Playlist will appear in the left window pane below the Recently Played category.
To rename this playlist, right-click and select Renamethen input your desired name. See Figure 6.5. |
|
Figure 6.5 � Rename Playlist
|
|
You can add content to your playlist by selecting a song, group of songs and/or albums, then dragging them from your main Music window into your new playlist. See Figure 6.6.
(Note: It is also possible to add songs to your playlist by right-clicking your selection and adding it to the corresponding playlist.)
|
|
Figure 6.6 � Adding Content to Playlists |
|
You can access additional menu options (as seen in Figure 4.5) by right-clicking your files in the main window. |
|
|


|
In List View, sort your files by �Name�, �Artist�, �Album�, �Time�, and �Genre� in �My Music� by clicking on the corresponding column header.
In Thumbnail View, sort your files by �Albums�, �Artists�, and �Genres� by selecting the corresponding button. |
|
|
|
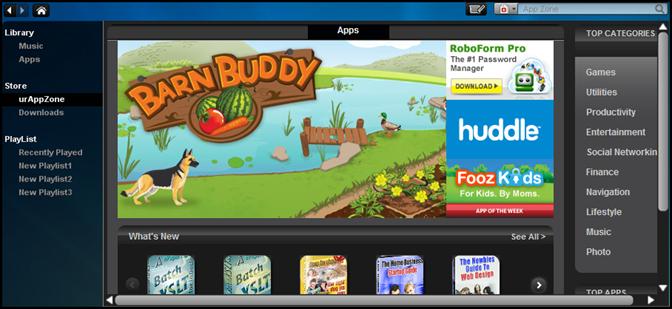
urAppZone is a portal that provides access to hundreds of downloadable games, applications, and utilities. You can sort by: What�s New, Top Rated, App Essentials, Top Categories and Top Apps (paid or free). For support information related to an application, please contact the application developer. |
|
While in My Music, you can navigate to urAppZone by selecting it from the left window pane. See Figure 7.1.
(Note - You can also access urAppZone from the urDrive home desktop by clicking on the feature Store.)
|
|
Figure 7.1 � Store Directory |
|
|
|
|
|
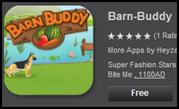
To download an application, you must be signed into your urDrive account. For sign in information, please refer back to Figure 3.1.
Once signed in, click on the app and select Free or Buy and complete the download process. See Figure 7.2.
To view the application download progress select Downloads from the left window pane.
|
|
Figure 7.2 � Application Download
|
|
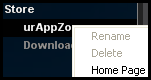
While in urAppZone, you can return to the home page by right-clicking urAppZone and selecting Home Page as seen in Figure 7.3.
(Note: urAppZone and Downloads cannot be renamed or deleted as they are required for urDrive functionality.) |
|
Figure 7.3 � urAppZone Home
|
|
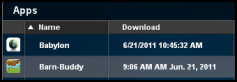
The Apps download directory, as seen in Figure 7.4, displays all applications downloaded from urAppZone.
(Note � By double-clicking the app, you will be redirected to the app developer�s web page or launch an installation utility. Most applications are intended for PC installation.)
|
|
Figure 7.4 � App Download Directory
|

|
|
|
The My Videos icon provides access to all of the video content stored on urDrive (in the Video folder).� Only the file types supported by My Videos will display in this section.� [Supported file type(s): .avi, .asf, .mpeg, .mpg, .wmv, .rmvb, .rm, .dat, .mp4, .mov]
|
|
To view a video, double-click on the file. UrDrive uses your PC�s default video playback software to open your video files. |
|
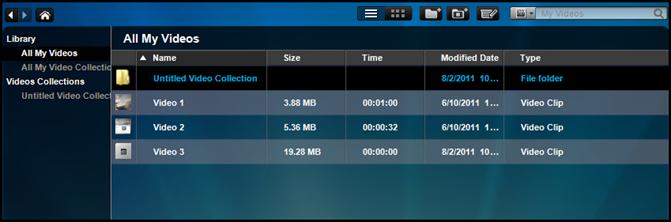
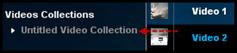
The video library displays all individual videos and video collections within your Videos folder.
This category is located on the left side of the My Music interface as seen in Figure 8.1. |
|
Figure 8.1 � Video Library
|
|
|
|
|
|
Add video content by clicking the Import Videos and Collections button. From here you can import individual videos or complete collections into My Videos. See Figure 8.2.
|
|
Figure 8.2 � Import Videos and Collections
|
|
Create a Video Collection by selecting the folder icon seen in Figure 8.3. |
|
Figure 8.3 � Create Video Collection
|
|
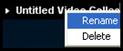
Your new Untitled Video Collection will appear in the left window pane below the Video Collections category.
To rename this collection, right-click and select Renamethen input your desired name. See Figure 8.4.
|
|
Figure 8.4 � Rename Video Collection |
|
You can add content to your collection by selecting a video or group of videos, then dragging them from your main All My Videos window into your new collection. See Figure 8.5
|
|
Figure 8.5 � Adding Content to Video Collections |
|
You can access additional menu options (as seen in Figure 4.5) by right-clicking your files in the main window. |
|
|
|
Sort your files by �Name�, �Size�, �Time�, �Modified Date�, and �Type� in �My Videos� by clicking on the corresponding column header. |
|
|
|
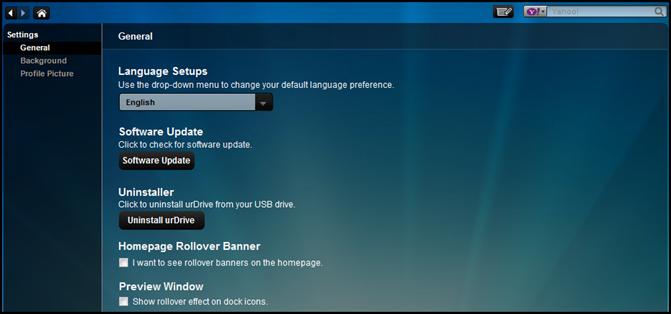
The Settings icon allows you to customize the user-experience by providing access to interface preferences available on urDrive. |
|
Choose your language preference, check for software updates, or uninstall urDrive by selecting the corresponding option.
(Note: For a streamlined home page interface, you can also disable the �Rollover Banners� by deselecting them from within the settings screen.) |
|
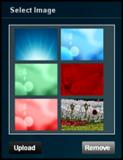
Personalize your UrDrive home desktop with a custom background by uploading your own image or by selecting one of the default images provided.� Please refer to Figure 9.1.
To upload your own image: select Upload and browse to the location of the image you want to use, open it and select Apply to proceed.�
You can also choose to Center, Tile, or Stretch the image for different appearances.
|
|
Figure 9.1 � Custom Background |
|
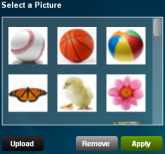
Personalize your urDrive profile by adding a custom profile picture.� Choose from the provided pictures or upload your own image. See Figure 9.2.
To upload your own image: select Upload and browse to the location of the image you want to use, open it and select Apply to proceed.
(Note: Your profile picture will not appear while you are signed into your urDrive account.) |
|
Figure 9.2 � Profile Picture |
|
|
|
|
|
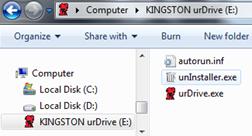
Your new USB drive will contain certain files and folders necessary for urDrive operation. Access the root directory of your drive the same way you would with any USB drive by selecting Start>Computer (or �My Computer�) and navigate to Kingston urDrive. |
|
By default, your drive will have the following files located in the root directory:
� autorun.inf � unInstaller.exe � urDrive.exe
See Figure 10.1.
|
|
Figure 10.1 � Root Directory
|
|
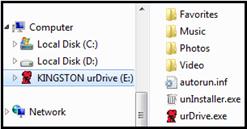
As you click through the Navigation Bar, certain folders will be created so that any content you transfer into these sections will appear in the appropriate folder.
Accessing My Photos will create the Photos folder, My Music will create the Music folder and My Videos will create the Video folder in the root directory. See Figure 10.2.
(Note: Adding an item to your Favorites location on the home desktop will create the Favorites folder.)
|
|
Figure 10.2 � Root Directory with Folders
|